R读写xlsx文件
- 安装和加载 xlsx 包:在 R 中处理 xlsx 文件(如 Excel 电子表格)需要安装并加载
xlsx包,使用命令install.packages("xlsx")和library("xlsx")。 - 读取 xlsx 文件:使用
read.xlsx()函数从 xlsx 文件读取数据,指定文件路径、工作表索引(sheetIndex)、行(rowIndex)、列(colIndex)范围,或从特定行(startRow)开始读取。 - 写入 xlsx 文件:用
write.xlsx()函数将数据(如数据框)写入 xlsx 文件,可以指定文件路径和工作表名称(sheetName)以重命名工作表。
xlsx 是一种用于 Microsoft Excel 电子表格的文件格式。Excel 可用于存储表格数据。
R 内置了功能,使读取和写入 xlsx 文件变得简单。
示例 xlsx 文件
为了演示如何在 R 中读取 xlsx 文件,假设我们有一个名为 studentinfo.xlsx 的 Excel 文件,其中包含以下数据:
我们将使用 R 的内置函数读取这些数据。
安装并加载 xlsx 包
为了在 R 中读取、写入和格式化 Excel 文件,我们首先需要安装并加载 xlsx 包:
# 安装 xlsx 包
install.package("xlsx")

# 加载 xlsx 包
library("xlsx")
这里,我们已经成功安装并加载了 xlsx 包。
现在,我们可以从 xlsx 文件中读取数据了。
在 R 中读取 xlsx 文件
在 R 中,我们使用 read.xlsx() 函数来读取当前目录中的 xlsx 文件。例如,
# 安装 xlsx 包
install.package("xlsx")

# 加载 xlsx 包
library("xlsx")

# 从当前目录读取 studentinfo.xlsx 文件
read_data <- read.xlsx("studentinfo.xlsx", sheetIndex = 1)

# 展示 xlsx 文件
print(read_data)
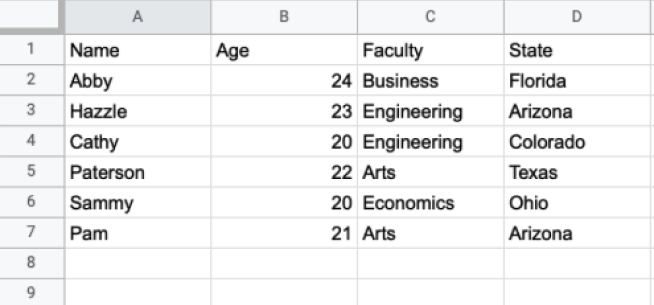
输出
      Name      Age   Faculty           State
1    Abby       24     Business         Florida
2    Hazzle     23     Engineering      Arizona
3    Cathy      20     Engineering      Colorado
4    Paterson   22     Arts             Texas
5    Sammy      20     Economics        Ohio
6    Pam         2     Arts             Arizona
在上面的示例中,我们读取了当前目录中的 studentinfo.xlsx 文件。注意代码,
read_data <- read.xlsx("studentinfo.xlsx", sheetIndex = 1)
这里,
read.xlsx()- 读取了 xlsx 文件studentinfo.xlsx并创建了一个数据框,存储在read_data变量中。sheetIndex = 1- 读取指定的工作表,即 1
注意:
- 如果文件位于其他位置,我们必须指定路径及文件名,如:
read.xlsx("D:/folder1/studentinfo.xlsx", sheetIndex = 1)。 - 如果我们处理的数据集较大,我们也可以使用
read.xlsx2()函数。
R 中 xlsx 的 rowIndex 和 colIndex 参数
在 R 中,我们还可以从 excel 文件中读取特定范围的数据。我们可以在 read.xlsx() 中传递 rowIndex 和 colIndex 参数来读取特定范围。
rowIndex- 读取特定范围的行colIndex- 读取特定范围的列
示例:读取行范围
# 安装 xlsx 包
install.package("xlsx")

# 加载 xlsx 包
library("xlsx")

# 读取 xlsx 文件的前五行
read_data <- read.xlsx("studentinfo.xlsx",
  sheetIndex = 1,
  rowIndex = 1:5
)

# 展示 xlsx 文件
print(read_data)
输出
      姓名       年龄    学院             州
1    Abby       24     商学院           佛罗里达
2    Hazzle     23     工程学院         亚利桑那
3    Cathy      20     工程学院         科罗拉多
4    Paterson   22     艺术学院         德克萨斯
在上述示例中,我们在 read.xlsx() 函数中传递了 rowIndex = 1:5,因此该函数只从 studentinfo.xlsx 文件中读取前五行。
示例:读取列的范围
# 安装 xlsx 包
install.package("xlsx")

# 加载 xlsx 文件
library("xlsx")

# 读取 xlsx 文件的前三列
read_data <- read.xlsx("studentinfo.xlsx",
  sheetIndex = 1,
  colIndex = 1:3
)

# 展示 xlsx 文件
print(read_data)
输出
      姓名       年龄    学院
1    Abby       24     商学院
2    Hazzle     23     工程学院
3    Cathy      20     工程学院
4    Paterson  22     艺术学院
5    Sammy    20    经济学院
6    Pam         21    艺术学院
这里,colIndex = 1:3 在 read.xlsx() 中只读取 studentinfo.xlsx 文件的前三列。
R 中的 xlsx startRow 参数
有时 Excel 文件开头可能包含我们不想包括的标题。例如,
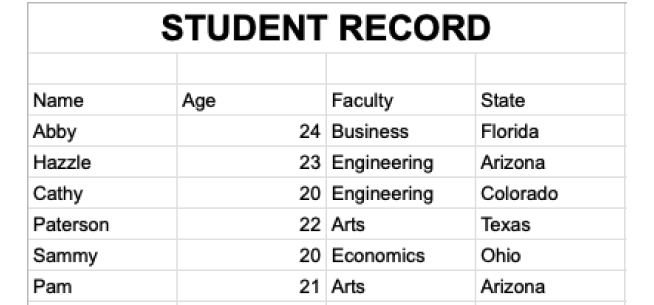
这里,Excel 文件的第1行包含标题,第2行为空。所以我们不想包括这两行。
要从 Excel 工作表的特定行开始读取数据,我们在 read.xlsx() 中传递 startRow 参数。
让我们看一个示例,
# 安装 xlsx 包
install.package("xlsx")

# 加载 xlsx 文件
library("xlsx")

# 从第3行开始读取
read_data <- read.xlsx("studentinfo.xlsx",
  sheetIndex = 1,
  startRow = 3
)

# 展示 xlsx 文件
print(read_data)
输出
      姓名       年龄    学院             州
1    Abby       24     商学院           佛罗里达
2    Hazzle     23     工程学院         亚利桑那
3    Cathy      20     工程学院         科罗拉多
4    Paterson   22     艺术学院         德克萨斯
5    Sammy      20     经济学院         俄亥俄
6    Pam        21     艺术学院         亚利桑那
在上述示例中,我们在 read.xlsx() 函数中使用了 startRow 参数,从指定的行开始读取数据。
startRow = 3 表示前两行被忽略,read.xlsx() 从第3行开始读取数据。
在 R 中写入 xlsx 文件
在 R 中,我们使用 write.xlsx() 函数将数据写入 xlsx 文件。我们以 数据框 的形式传递数据。例如,
# 安装 xlsx 包
install.package("xlsx")
# 加载 xlsx 文件
library("xlsx")
# 创建一个数据框
dataframe1 <- data.frame (
Name = c("Juan", "Alcaraz", "Simantha"),
Age = c(22, 15, 19),
Vote = c(TRUE, FALSE, TRUE))
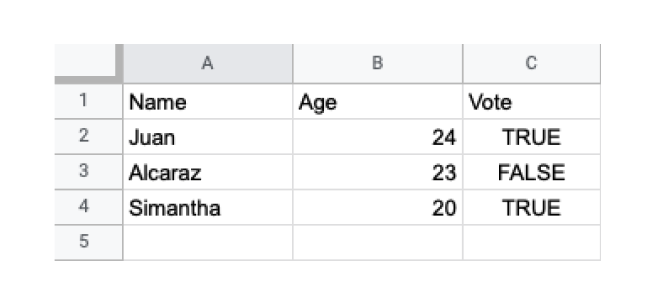
# 将 dataframe1 写入 file1.xlsx 文件
write.xlsx(dataframe1, "file1.xlsx")
在上述示例中,我们使用 write.xlsx() 函数将名为 dataframe1 的数据框导出到一个 xlsx 文件。注意传递给 write.xlsx() 的参数,
write.xlsx(dataframe1, "file1.xlsx")
这里,
dataframe1- 我们想要导出的数据框的名称file1.xlsx- xlsx 文件的名称
最后,file1.xlsx 文件在我们的目录中看起来像这样:
重命名当前工作表
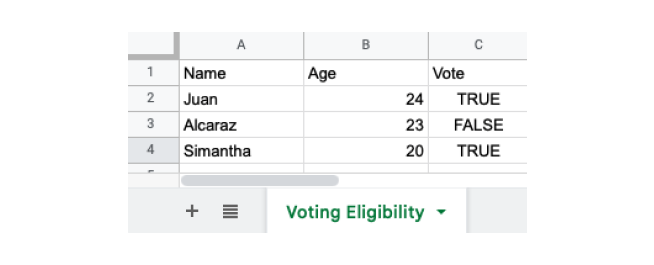
我们可以使用 write.xlsx() 函数中的 sheetName 参数来重命名当前工作表。例如,
# 安装 xlsx 包
install.package("xlsx")

# 加载 xlsx 文件
library("xlsx")

# 创建一个数据框
dataframe1 <- data.frame (
  Name = c("Juan", "Alcaraz", "Simantha"),
  Age = c(22, 15, 19),
  Vote = c(TRUE, FALSE, TRUE))

# 命名当前工作表
write.xlsx(dataframe1, "file1.xlsx",
  sheetName = "Voting Eligibility"
)
这里,我们在 write.xlsx() 中传递了 sheetname = "Voting Eligibility",所以工作表的名称变更为 "Voting Eligibility"。
因此 file1.xlsx 看起来像这样: